Home » Articles posted by Luna Nelson
Author Archives: Luna Nelson
A Closer Look at the Tasks Plumbers Perform
Plumbers install, repair and maintain the pipes and fixtures that provide water, gas, waste disposal and heating to residential and commercial properties. Their duties include interpreting blueprints and building codes, inspecting and testing pipes for leaks, clearing blockages and power flushing drains and heating systems.
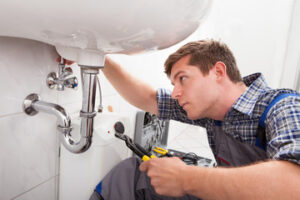
They work in a variety of settings and are often called on for emergency services. They must be able to think analytically and approach problems systematically in order to solve them. Contact Plumbers Near Me Prices for professional help.
While the allure of DIY plumbing is strong, especially with TikTok videos showing novices how to do it themselves, it’s best left to professional plumbers. Poor installation can lead to leaks, water damage, and even health risks like mold growth. Professional plumbers have the training, tools, and experience to get the job done right the first time around.
A plumbing system consists of pipes that transport potable water, wastewater, and steam throughout a building. Plumbers install these systems in new construction, renovations, and repairs. They consider factors like water demand, fixture requirements, and building specifications to design a system that meets the needs of the client. They also take into account the type of water source (public or private) to determine if water treatment systems are needed.
During the plumbing installation process, plumbers connect fixtures like toilets, showerheads, and faucets to the pipe system. They may also install appliances like water heaters and dishwashers. The final step in plumbing installation is testing the system to ensure there are no leaks and that it can handle the expected water pressure. This is typically done with a manometer, which is similar to a heartbeat monitor for pipes. If the air pressure drops, it indicates a leak somewhere in the system. Plumbers seal the joints and caulk around fixtures to prevent water leakage.
In addition to installing and repairing plumbing systems, plumbers can also do plumbing rough-ins for new construction projects. This includes installing vents, sewers, and connections for future use. They may also inspect and test the plumbing system after installation to ensure it meets building codes and standards.
When working on a plumbing installation project, it is important to use high-quality materials to ensure the longevity of the system. This will protect the plumbing from wear and tear, which can reduce efficiency and cause costly repairs down the line. It is also important to document all work performed, as this will be helpful in the event of future problems or repairs. Finally, it is important to obtain the proper permits for plumbing installations, as failure to do so can result in fines and delays.
Maintenance
Most plumbers know that routine maintenance is essential to the longevity of plumbing systems. It helps identify and resolve minor issues before they become major problems, saving businesses money and minimizing disruptions to their operations.
Plumbing maintenance includes visual inspections, cleaning, testing water pressure, examining toilet components, and addressing drain and sewer line issues. Performing these tasks on a regular basis can help prevent major plumbing disasters like leaky faucets, overflowing toilets, and low water pressure.
One of the most common maintenance issues is clogged drains. Hair, food particles, and other debris can build up in pipes and cause blockages. To avoid these issues, plumbers recommend installing drain screens to catch debris and regularly cleaning them with a snake or drain cleaner.
Another key element of maintenance is ensuring that the water shut-off valve works properly. This valve is vital for preventing water damage in the event of an emergency and should be tested regularly to ensure that it functions correctly.
Plumbing maintenance also includes addressing mineral build-up in pipes and fixtures. Over time, minerals such as calcium and magnesium build up in pipes and reduce water flow and pressure. Plumbers can remove these deposits and restore optimal water flow and pressure.
In addition to regular maintenance, plumbers must also keep their tools in good working condition. This requires cleaning and lubricating them on a regular basis to prevent wear and tear, and it also helps to identify any issues with equipment that may need replacement parts. Using high-quality replacement parts can ensure that plumbing systems last longer and remain in good working order.
Preventative plumbing maintenance isn’t just a technical practice—it’s an investment in the safety and comfort of a business’s occupants and its assets. By implementing best practices and using advanced technology, plumbers can make smart decisions about when to perform maintenance and which tools to use for each task. This shifts maintenance from a reactive to a proactive process, optimizing asset performance and elevating customer satisfaction.
Repair
Plumbing systems are essential for the safe and efficient operation of homes and businesses. They provide water, take away waste, and regulate indoor climate through a network of pipes, valves, fixtures, and appliances. Plumbers install these systems in new buildings and make repairs to existing ones. They often work with hand tools and power equipment, but may also use specialized machinery to unclog drains or repair broken pipes. Plumbers must be comfortable working in a variety of environments and situations, including cramped spaces or at heights.
Commercial and industrial plumbing: Plumbers who specialize in commercial and industrial plumbing work focus on larger-scale piping and equipment systems that serve multiple outlets at once. They may also handle more complex plumbing issues, such as those involving steam radiators or hot water heaters. These plumbers often need to follow strict building codes and regulations when installing or repairing these systems.
Service and repair plumbers: Also known as “repair technicians,” service and repair plumbers troubleshoot problems with pipes, fixtures, and appliances. They may fix leaks, repair toilets and faucets, or inspect and replace sewer lines and water heaters. These plumbers typically need to have experience with a wide range of plumbing materials and components, as well as the ability to read blueprints and understand electrical schematics.
Plumbers also use their skills to help customers choose and maintain the best plumbing solutions for their needs. This involves explaining the advantages of different products and educating customers on how to care for their plumbing systems. It also involves providing accurate estimates for repair costs. While some plumbers may charge high rates for emergency services, others may offer competitive pricing and quality workmanship. When choosing a plumber, it’s important to ask about their training and certifications as well as any guarantees they offer. Also, be sure to compare prices between plumbers and ask about any hidden fees. By taking the time to research and select a plumber, homeowners can minimize costly repairs in the future. For example, fixing a small crack in a pipe with epoxy rather than replacing it could save homeowners hundreds or even thousands of dollars down the road.
Customer Service
Customer satisfaction is a key factor for plumbing businesses, as satisfied customers tend to be repeat clients and referrers, which helps foster business growth. To achieve high levels of customer satisfaction, plumbers can implement several strategies including offering quality workmanship and services, providing transparent and fair pricing, ensuring timely service appointments, and building strong relationships with customers through personalized interactions.
When customers reach out to a plumbing company for a service, they expect the call center to effectively communicate with them throughout the process. Whether it’s through social media, email, or phone calls, plumbers must be able to answer questions and provide relevant information that gives the customer peace of mind. This can be done through efficient problem-solving, open communication, and educating customers about their plumbing needs and solutions.
The plumbing call booking process is another vital aspect of plumbing customer service. To improve the efficiency of their plumbing call center, plumbers can use software like ServiceTitan, which offers plumbing scripts to ensure CSRs accurately gather the necessary information and book plumbing jobs quickly. The software also streamlines workflow, enables scheduling and dispatching, provides property data to plumbers, and enables managers to listen to calls so they can coach their CSRs on best practices.
In addition to having quality workmanship, plumbers can increase customer satisfaction by demonstrating professionalism in their conduct and appearance. This includes being courteous, respecting the customer’s home or business, and ensuring cleanliness before and after servicing. Moreover, plumbing companies can foster a sense of trust with their customers by being available to answer any questions or concerns promptly.
Providing transparent and fair pricing is another critical element of plumbing customer service. This ensures that customers understand the costs associated with their plumbing work, reducing confusion and anxiety. Moreover, plumbing companies can set themselves apart from competitors by providing upfront pricing and estimates, which allows customers to easily compare services and choose the most affordable option.
In the highly competitive plumbing industry, customer satisfaction is a crucial component for gaining a competitive edge. To achieve high levels of customer satisfaction, plumbing businesses can focus on a number of factors including delivering exceptional customer service, ensuring timely and efficient service, providing clear and transparent communication, utilizing technology to streamline communication and improve job management, and establishing strong relationships with customers through personalized interactions.
Ceiling Repairs
Ceiling Repairs Perth can make a world of difference to the overall appearance and functionality of your home or office. Addressing common issues such as cracks, water stains, outdated textures, and popcorn ceiling removal can breathe new life into any space.

Regular inspections of your ceiling can help to identify early signs of damage. Minor problems such as hairline cracks can be repaired with joint compound or drywall mud, while leaks should be addressed promptly to prevent further structural damage.
Cracks in ceilings are fairly common and can be caused by anything from settling of the house to water damage or a structural problem. However, it is important to take any cracks in the ceiling seriously and get a professional assessment to find out what is causing them.
Hairline cracks in the ceiling are usually a sign of normal movement and can be repaired with spackle or drywall mud. However, large cracks in the center of the ceiling are a sign that there is serious structural damage and should be looked at by either a foundation repair contractor or a structural engineer. Cracks that are accompanied by sagging of the ceiling are also a sign of structural problems and need to be addressed immediately.
The location of a crack is also important to determine its severity. If the crack is near a pipe, it could be due to a leak in the plumbing. Cracks near windows or doors are often a sign of differential settlement. Cracks that form along walls are usually caused by a change in temperature or moisture in the home.
Ceiling cracks can be cleaned up by removing the loose plaster and then using joint compound or drywall mud to fill in the crack. When repairing the crack, it is a good idea to put down a sheet of plastic underneath since you will be loosening debris and applying mud which will make your floor messy. After completing the crack repair, it is important to allow the mud to dry overnight and then to sand it smooth.
Discolored cracks in the ceiling are a sign of water damage and should be addressed by finding out where the water is coming from and then making any necessary repairs. A leaking roof or bathroom is often the source of these cracks.
A gap between the wall and ceiling is often a sign of a truss uplift. This can be caused by a structural problem or insufficient framing of the trusses which may have been done incorrectly during construction. Gaps between the wall and ceiling can be filled with joint compound or drywall mud but it is important to have an expert evaluate the issue first to determine what needs to be fixed.
Water Stains
Water stains on the ceiling are more than just an eyesore; they may signal more serious damage to your home. The best course of action when it comes to water stains is to consult a professional and to treat the underlying cause of the staining. Water spots and stains are often symptoms of leaky roofs, malfunctioning HVAC systems, or plumbing problems playing hide-and-seek with your walls and ceilings. In addition to causing cosmetic damage, water spots and stains can also lead to mold growth.
The first step is to find the source of the stain. Whether it’s coming from the roof, an upper-level bathroom, or a leaking pipe, there needs to be repairs made as soon as possible to avoid further damage and potential health issues down the road.
Once you’ve repaired the source of the stains, you can then begin the cleaning process. Cleaning with a mild homemade bleach solution will help fade the stain and remove any lingering mildew, grease, or dirt that can prevent the primer and paint from adhering to the ceiling. After the area has been cleaned, you’ll want to apply a stain blocking primer to prepare for repainting.
When it’s time to repaint the ceiling, be sure to choose a color that matches the rest of your home’s walls and trim for a seamless look. Apply the paint using a brush or roller, feathering the edges for a smooth transition between the repaired areas and the rest of the ceiling.
Ceilings are one of the most important components of your home, and it’s essential to keep them in good condition to protect your family from moisture damage and structural degradation. When a ceiling is damaged, you’ll need to repair it to restore its integrity and maintain your home’s aesthetic appeal. Taking steps to address the damage quickly can minimize costs and save you time, money, and headaches in the long run. By following these simple tips, you can keep your home’s ceilings looking great and functioning properly for years to come.
Texture
Texture is a great tool for disguising any damage to your ceiling. However, if you do need to make repairs to a textured ceiling, it can become very obvious and stand out more than the damaged area if the new texture is not matched properly. That is why it is important to have a good contractor with experience doing retexturing on walls and ceilings.
The process is fairly simple, but it does require special tools and technique to do correctly. To start, the damaged area should be prepped. That means laying a drop cloth under the work area, and removing any dust or cobwebs from the ceiling as well as from the surrounding areas. Then spray the existing texture with some warm water to soften it, and scrape away the old material. This can be a messy job, so it is helpful to have a large tarp to catch the old material as you go.
Once all the old texture has been removed you can begin the process of creating the new texture. It is best to practice on some scrap drywall first, in order to get a feel for the material and your tools. You will also want to experiment with the style of texture you are going for, and test it on a small area of the ceiling before applying it to the entire room.
When applying the texture, it is best to use a roller with a wide brush, as this will give you the most control. If you are rolling very close to a wall, it is helpful to have some kind of paint edger or piece of aluminum flashing on hand to protect the walls and flooring from getting the wet texture onto them. Finally, be sure to feather the new texture into the original ceiling at least 4 or 6 inches around the repair. If you keep working the texture too long, it will dry, clump, and look “worked”. Be sure to let it sit for a minute or two before continuing. This will ensure that the texture is blended properly and looks like it has always been part of the ceiling.
Maintenance
The ceilings of homes face a variety of issues that require repair. Some of these include cracks, water damage, and sagging. Regular inspections and maintenance help homeowners recognize problems early on so that they can be addressed before they become more serious. These minor repairs can prevent costly structural damage and save time and money.
One of the most common and expensive problems is water damage from ceiling leaks. When a leak is ignored, it can cause significant damage to drywall, insulation, and other materials. In addition, it can lead to mold growth and rot. To resolve the problem, homeowners must identify and repair the source of the leak.
Leaks can also be caused by clogged gutters, downspouts, and roof leaks. If left unattended, the leaking water can ruin carpet and wood floors in addition to damaging ceiling materials. Homeowners can prevent future leaks by inspecting their homes regularly, especially after heavy rains or winds.
When it comes to repairing a leak, the first step is to remove any drywall or insulation that has been saturated with water. This will prevent the spread of moisture and mold, and it will allow the area to dry before completing any additional repairs. After the affected areas are dried, they can be repaired using a drywall patch or replacement. It is important to use a moisture meter to ensure that the area is completely dry before beginning the repair process.
Cracks and holes can be filled with joint compound or plaster, depending on the type of ceiling. It is important to choose a setting-type joint compound for larger repairs because it dries faster and shrinks less than other types of compounds. When filling in these repairs, be sure to sand the surface until it is smooth. This will prevent the cracks from reappearing over time.
Another way to avoid major damages is by adding insulation to your ceilings. This will help reduce the noise from things like traffic, car horns, and construction. It can also improve the comfort of your home and increase its resale value.
AC Repair – How to Keep Your AC System Running Properly
A professional technician thoroughly inspects your air conditioner during a routine maintenance appointment. This thorough assessment helps them identify any potential issues or wear and tear that might cause a breakdown in the future.
This preventative process helps you avoid expensive AC Repair Round Rock costs in the future. It also ensures your home is always comfortable for your family.
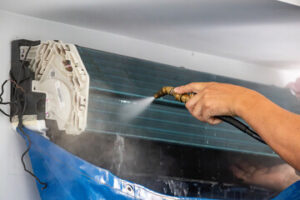
The condenser is one of the most critical components of an AC system. It takes the high-pressure refrigerant that comes in gaseous form from the compressor and transforms it into a liquid state so that it can transfer heat from your home to the air. It does this by passing the refrigerant through a series of coils that are arranged to maximize heat transfer efficiency.
If the airflow through the condenser is obstructed, your system will have a hard time cooling your home effectively. The best way to keep your condenser clean and in good working condition is to have your HVAC technician clear the area around it on a regular basis. This will help ensure that it is always working at maximum efficiency.
A faulty condenser unit can put a lot of strain on the rest of your system, leading to poor performance and possibly premature failure. This is why it is a good idea to get a high-quality condenser for your system if you are replacing it. It will work better with the air handler and will last longer, saving you money in the long run.
Among the most common AC repair issues is that the condenser coils are dirty. This can be caused by a variety of factors, including dirty air filters, clogged ducts, and low refrigerant levels. The good news is that cleaning a condenser coil is relatively easy for an experienced technician.
Another common problem is that the condenser fan is not working properly. This may be due to a blown capacitor, bent blades, or a dead motor. It is possible to replace the fan motor or blower assembly on an existing condenser, depending on the cause of the problem.
An increase in leaks from the condenser is also a sign of a faulty unit. This can lead to a loss of refrigerant, which is not good for your compressor or your system as a whole. A leaking condenser can also damage your home’s ductwork and lead to a reduction in indoor comfort.
Keeping your condenser clean and getting it repaired promptly by a professional AC repair company can help ensure that it stays in good working condition. Regular maintenance and inspections by an experienced technician will help reduce your system’s breakdown rates.
The Evaporator
Your AC evaporator coil is a crucial part of your system. Its absorption of heat from the air within your home is what starts the cooling process. Unfortunately, your evaporator coil can develop problems that affect the overall performance of your AC. The best way to keep your evaporator coil and the rest of your air conditioning working properly is to perform routine maintenance.
Located inside your air handler, the evaporator coil is made of metal and features U-shaped metallic tubes that easily absorb the warm air from your home. It also has metal “fins” that help the refrigerant circulate around the coil. This cools the refrigerant and turns it into a cold vapor that’s transferred to your condenser coil for further cooling.
A number of factors can cause your evaporator coil to develop a problem. One of the most common is a dirty air filter that can clog the coil. The clogged filter restricts airflow and causes the evaporator coil to work harder to cool your home. The evaporator coil can also be damaged by physical damage such as bent fins or electrical problems that result in short circuits.
Other issues that can negatively impact your evaporator coil include a faulty defrost cycle that prevents ice from forming on the coil, low levels of refrigerant fluid and corrosion of the metal coil. A frozen evaporator coil is often a sign that you need immediate AC repair.
The good news is that there are several things you can do to avoid problems with your evaporator coil, starting with regular maintenance. Changing the air filter two to three times per year will help reduce the amount of dirt that gets into the coil. You can also clean the outdoor unit of your AC and remove any vegetation or leaves that may be blocking its airflow.
However, repairing an air conditioner evaporator coil can require specialized tools not typically found in the average household toolkit. In addition, it’s important to work with a certified and trained professional who can perform the task quickly and efficiently.
The Compressor
The compressor is the heart of an AC system. It carries refrigerant from the condenser to the evaporator, which then cools the air in your home. The compressor is also responsible for absorbing heat from your home and transporting it to the condenser. Without a properly functioning compressor, your system cannot cool. A variety of issues can interfere with the operation of your air conditioning system’s compressor. These include:
A failing fan inhibits heat transfer and can cause your AC to shut off. This means that a repair or replacement fan is needed to keep your air conditioner running.
Blocked suction lines can also prevent your compressor from cooling properly. When these lines are too small, they restrict the flow of refrigerant into your compressor. This can overwork the unit, causing damage and resulting in a higher than normal energy bill.
Low refrigerant levels are another common AC problem. These are often the result of a leaky compressor. Fortunately, this can often be repaired by an experienced technician.
Strange odors can mean a problem with your compressor or ductwork. The odor may be caused by a clogged filter or dirty coils. It could also be the result of a problem with your thermostat. Regardless of the source, a professional inspection should be performed to ensure that your ducts are properly sealed.
Your AC technician will inspect the compressor for signs of a mechanical problem and replace any components that need it. This is why it’s important to schedule regular maintenance visits with a trusted HVAC company.
When you’re evaluating an AC repair company, look for one that is accredited by professional associations. This will offer proof that the technician is qualified to perform the work. Additionally, look for technicians who provide an in-person assessment of your system and propose solutions before giving you a quote. This way, you’ll be sure that the technician isn’t simply trying to sell you a new AC system. The assessment will also reveal other potential problems that you can have fixed before they become bigger ones. This can save you a lot of time, money and headaches down the road.
The Thermostat
The thermostat is the brains of your entire HVAC system. It keeps track of the current air temperature in your home and then tells heating and cooling equipment to turn on and off as needed. It’s also responsible for keeping track of the desired temperature settings, which can vary from room to room. Because of its critical role, it’s important to know when something might be wrong with your thermostat.
Thermostat Display is Dim or Blank
If your thermostat display screen goes dark, it could be a sign that the unit isn’t getting power. Check the batteries and the breaker in your home’s electrical panel to ensure that neither has been blown or tripped. If the problem persists, remove the thermostat cover and inspect for a dirty display screen, faulty wiring or loose screws.
Temperature Is Not Reaching Setpoint
If you’re still having trouble with your thermostat, it’s time to call for an AC repair technician. If your programmable thermostat isn’t following your pre-set temperatures, it may need to be replaced. An experienced technician will be able to find the right solution and replace it for you.
Alternatively, you might need to clean the unit itself or make sure that the vents aren’t blocked by furniture or other objects. A clogged or dirty filter can also restrict airflow and cause your cooling unit to overwork, which could lead to premature wear and tear.
Cooling Unevenly
If some rooms in your house feel cooler or warmer than others, it may be a sign that the ductwork needs to be cleaned, or the thermostat isn’t functioning properly. Thermostats often have error messages on their screens that name the problem, but older ones can also experience problems due to faulty wiring or old age.
You should never attempt DIY thermostat repairs. This is a task best left to an expert, since the device contains electrical connections that can cause bodily harm if you get it wrong. The good news is that our professional technicians can diagnose and fix any issues with your thermostat quickly and safely, so you don’t have to deal with the discomfort of an AC unit that doesn’t work as it should.